Introduction
Stubbing is a powerful technique that helps developers write focused, fast and deterministic tests, leading to higher quality software.
Developers use stubbing to isolate functionality of the application by simulating the behaviour of components and other dependencies. It allows focusing solely on the application itself. Apart from isolation, stubbing also makes tests run faster, as stubbed responses are usually lightweight and are returned quickly.
Stubbed testing at CECG
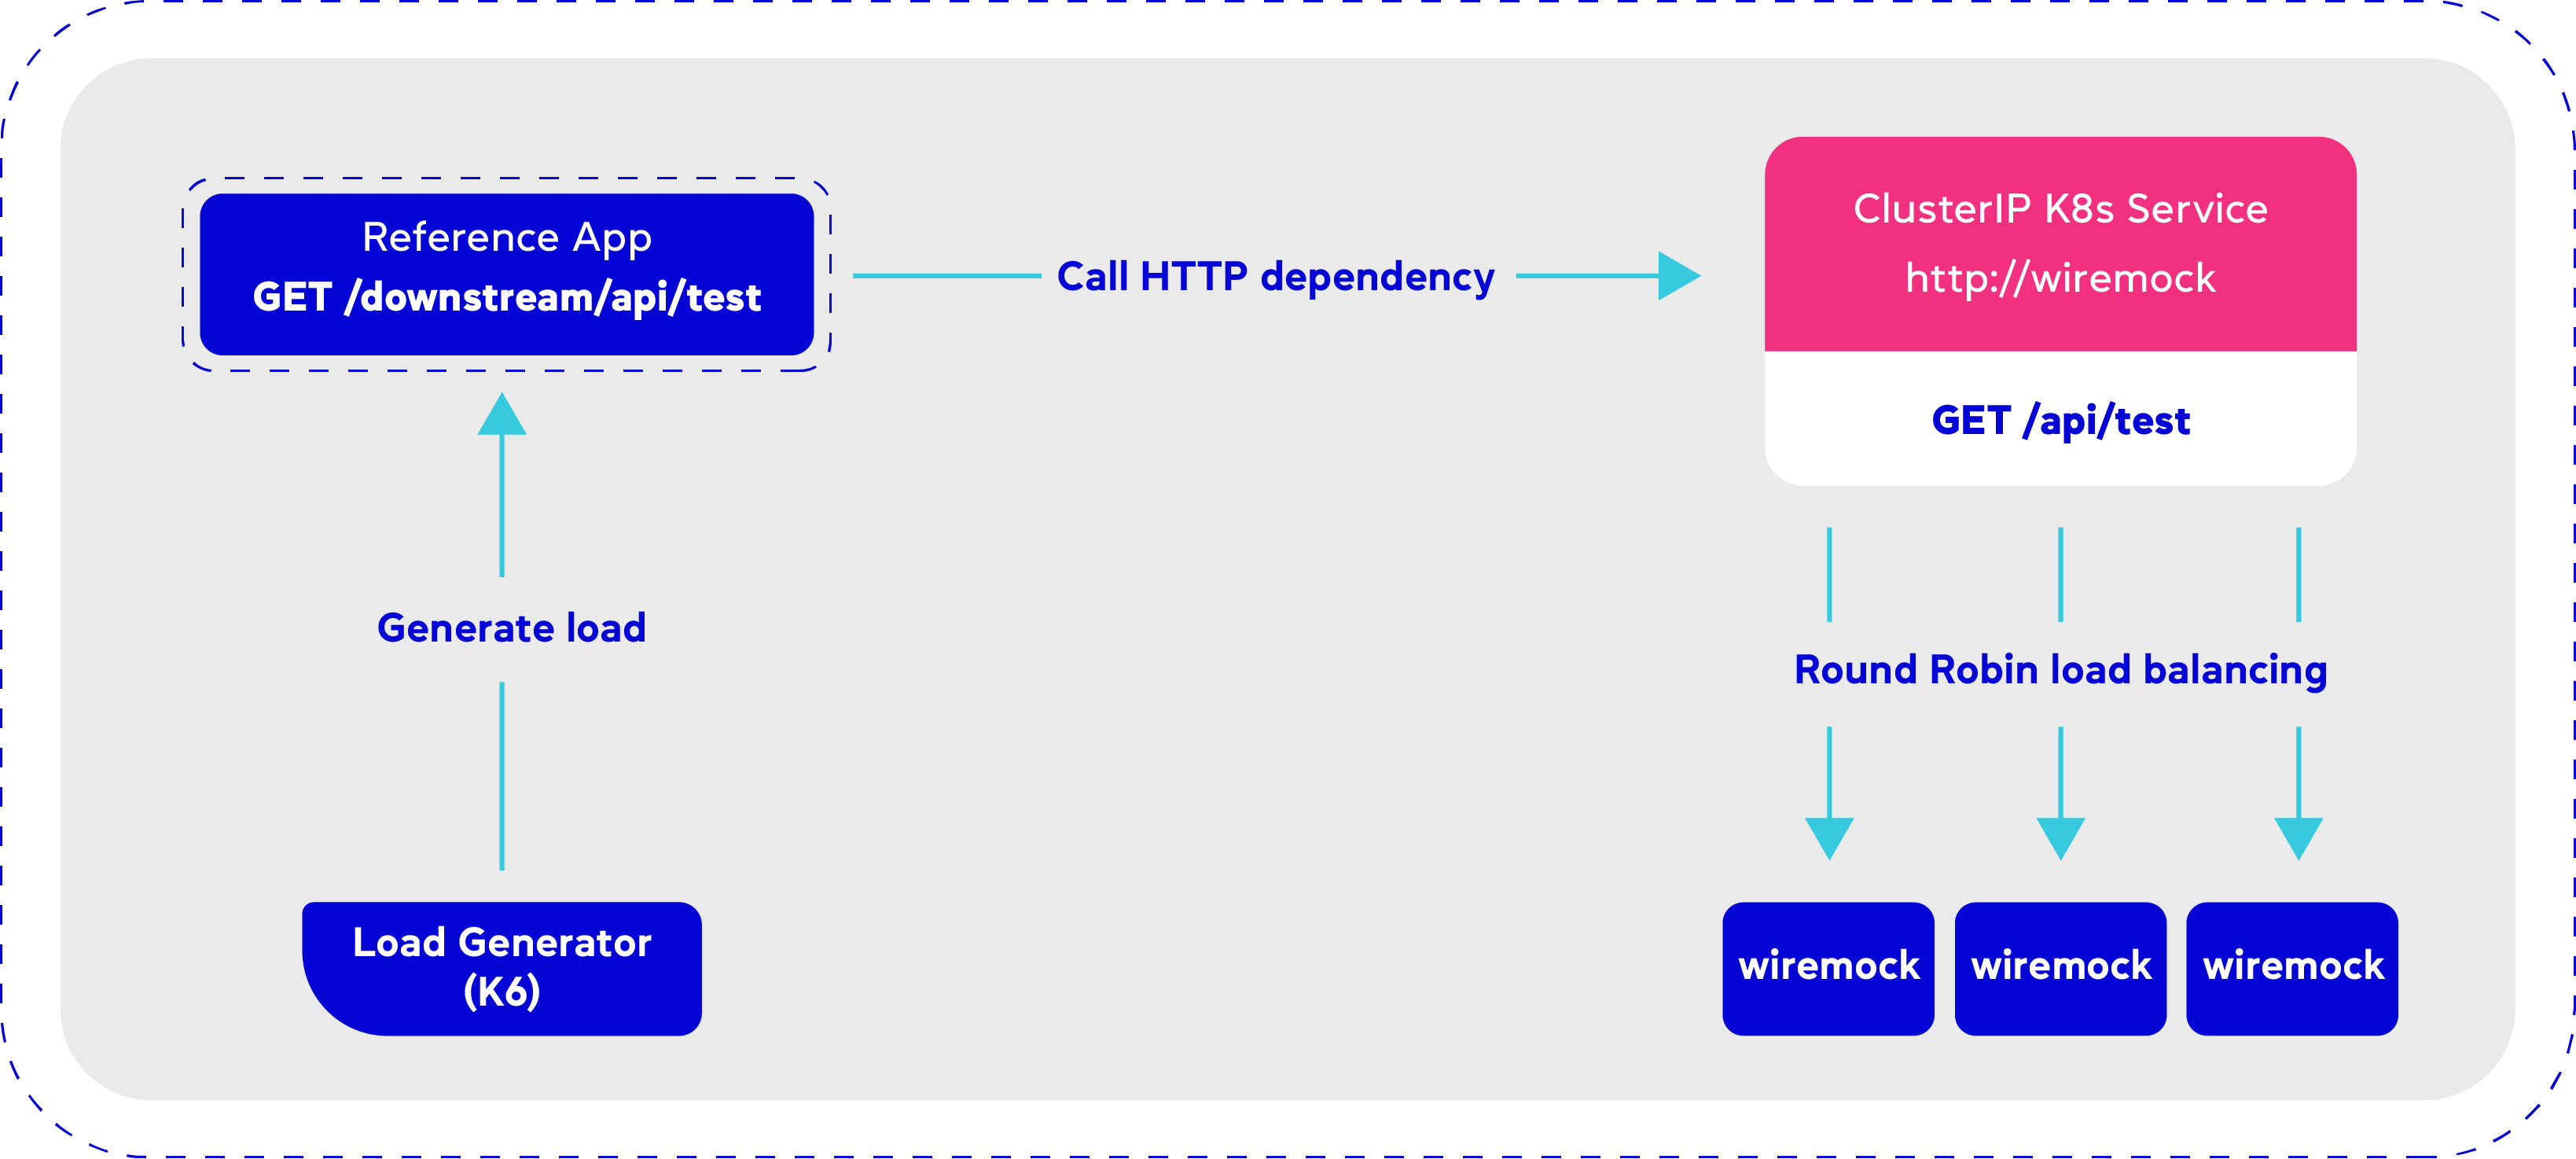
Our Path To Production pipeline (P2P) supports stubbed non-functional testing (NFT) scenarios to validate the performance of the application. In our reference NFT scenario we are sending the load to the app endpoint that makes a call to another dependency via HTTP.

In order to test the app in isolation we need to stub its dependencies. Our favourite tool for stubbing http calls is WireMock .
Why WireMock
WireMock allows you to configure static and dynamic stub mappings easily. While static mappings are loaded from the files in the mappings directory during startup, dynamic mappings can be created at any time by calling the Administration API.
Static stub mappings
Static mapping definitions can be stored in a ConfigMap:
---
apiVersion: v1
kind: ConfigMap
metadata:
 name: wiremock-mappings
data:
 static.json: |-
    {
     "request": {
       "method": "GET",
       "url": "/static"
     },
     "response": {
       "status": 200,
       "jsonBody": {
         "data": "static"
       },
       "headers": {
         "Content-Type": "application/json"
       }
     }
    }
and mounted as a Volume:
volumeMounts:
 - name: wiremock-mappings-volume
   mountPath: /home/wiremock/mappings
Dynamic stub mappings
The Administration API for creating new stub mappings is available on
POST /__admin/mappings endpoint.
Mappings are stored in memory and we need to re-create them on every test run. Check the section “Load generator setup” below to see how we call the API with JavaScript.
More details about Administration API can be found on WireMock website.
Tuning WireMock for high performance
A single WireMock instance can handle a reasonably high throughput. For a simple test plan with static payloads it can make more than a thousand requests per second, possibly over ten thousand if you provide it with lots of CPU and memory resources.
There are command line options that can maximise the performance of a single WireMock instance:
–no-request-journal
Disable the request journal, which records incoming requests for later verification.
–disable-request-logging
Prevent requests and responses from being sent to the notifier.
–async-response-enabled=true
Enable asynchronous request processing in Jetty.
More details about command line options can be found on WireMock website.
Scaling WireMock horizontally
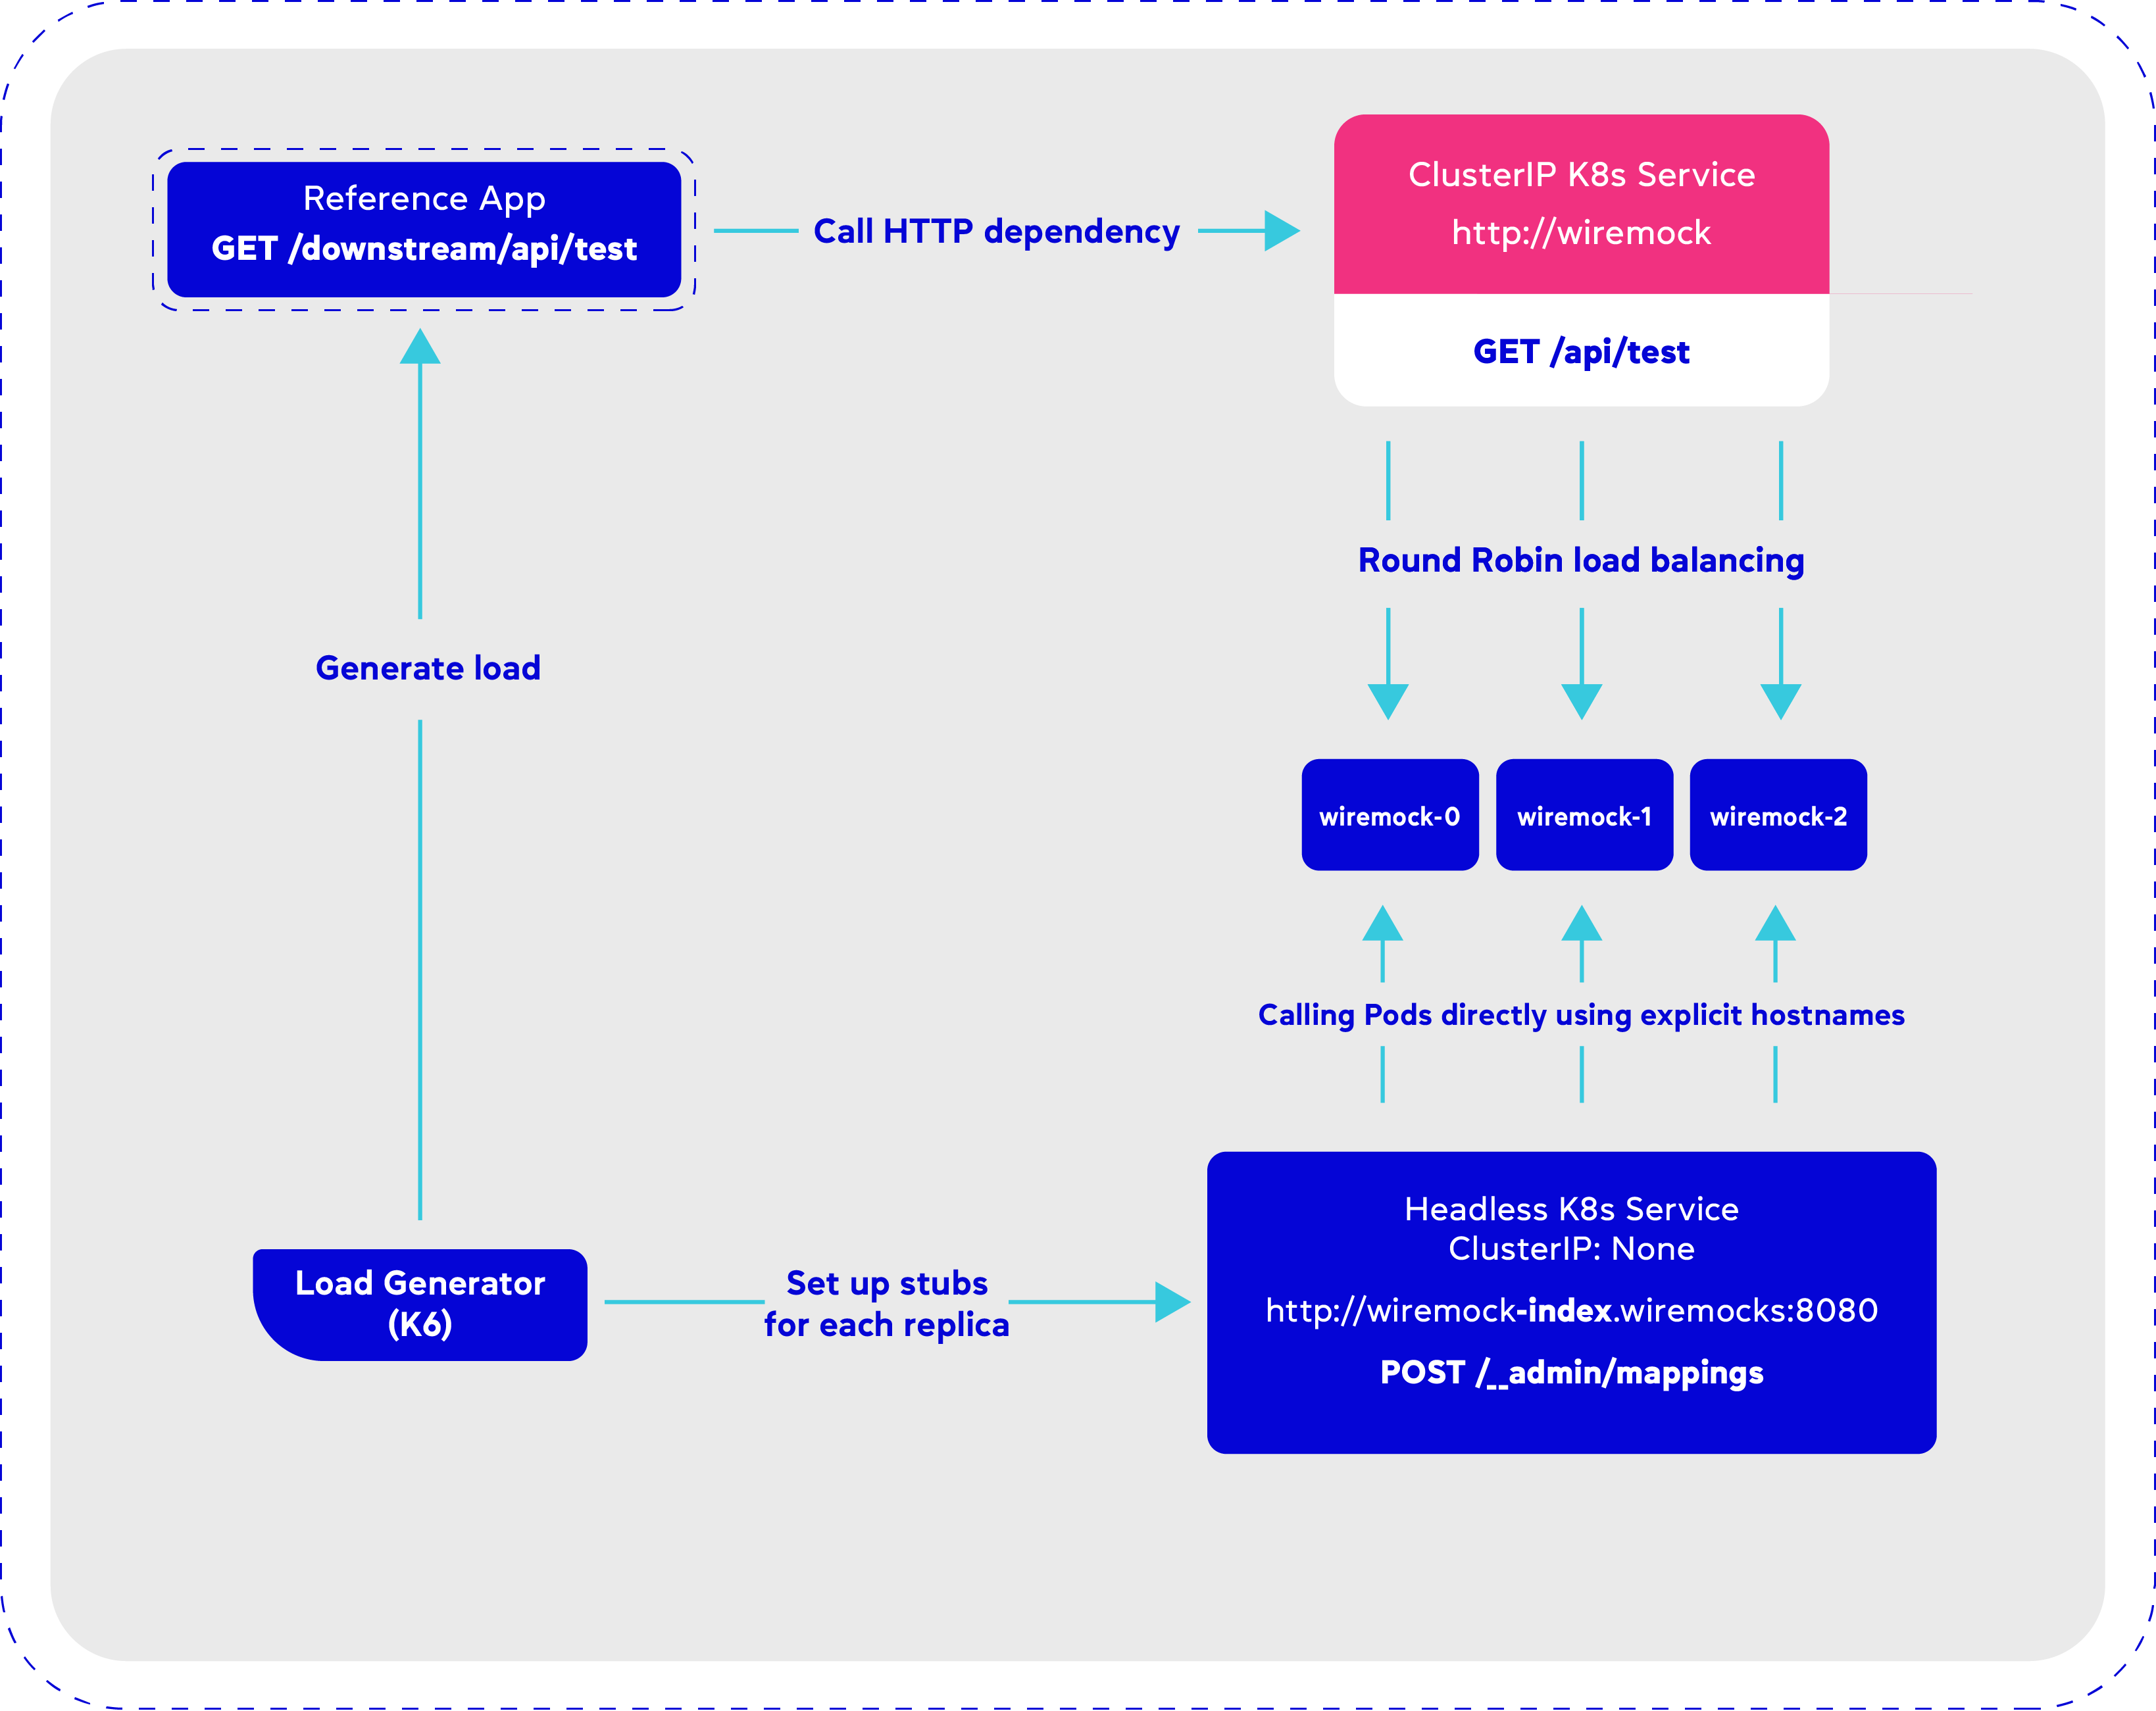
If you want to handle even more load then you may be limited by the capacity of a single instance. As we run our applications in Kubernetes we can easily scale WireMock horizontally by deploying more replicas.
The reference application will be sending requests to WireMocks via Service endpoint:
http://wiremock
The traffic will be load balanced between replicas using the Round Robin algorithm.
The following snippet shows an example of deploying multiple WireMock replicas:
---
apiVersion: apps/v1
kind: Deployment
metadata:
 name: wiremock
 labels:
   app.kubernetes.io/name: wiremock
spec:
 replicas: 3
 selector:
   matchLabels:
     app.kubernetes.io/name: wiremock
 template:
   metadata:
     labels:
       app.kubernetes.io/name: wiremock
   spec:
     containers:
       - name: wiremock
         image: wiremock/wiremock:3.4.2
         args:
           - "--no-request-journal"
           - "--disable-request-logging"
           - "--async-response-enabled"
           - "true"
         volumeMounts:
           - name: wiremock-mappings
             mountPath: /home/wiremock/mappings
         livenessProbe:
           httpGet:
             port: 8080
             path: /static
         readinessProbe:
           httpGet:
             port: 8080
             path: /static
         ports:
           - containerPort: 8080
     volumes:
       - name: wiremock-mappings
         configMap:
           name: wiremock-mappings

---
apiVersion: v1
kind: Service
metadata:
 name: wiremock
spec:
 selector:
   app.kubernetes.io/name: wiremock
 ports:
   - protocol: TCP
     port: 80
     targetPort: 8080
Problem with dynamic mappings
As we mentioned before, WireMock allows dynamic stub mappings to be created by calling the Administration API. The problem however is that the mappings are stored in memory, so we need to register mappings before running the test.
It was easily doable when we had just a single Pod, but now we have several replicas of WireMock running behind a Service. As the traffic is distributed between replicas we can’t reliably address specific WireMock instances. We need to find a way on how to access Administration API on each WireMock instance explicitly.
StatefulSet to the rescue
As we need to be able to configure WireMock instances explicitly we can deploy them as a StatefulSet together with a Headless Service.
The following snippet shows an example of the proposed setup:
---
apiVersion: apps/v1
kind: StatefulSet
metadata:
 name: wiremock
 labels:
   app.kubernetes.io/name: wiremock
spec:
 serviceName: wiremocks
 replicas: 3
 selector:
   matchLabels:
     app.kubernetes.io/name: wiremock
...
---
apiVersion: v1
kind: Service
metadata:
 name: wiremocks
spec:
 clusterIP: None # headless
 selector:
   app.kubernetes.io/name: wiremock
 ports:
   - protocol: TCP
     port: 8080
     targetPort: 8080
StatefulSet creates N Pods with names containing ordinal indexes.
+ kubectl get pods -l app.kubernetes.io/name=wiremock
NAME         READY   STATUS    RESTARTS   AGE
wiremock-0   1/1     Running   0          2h
wiremock-1   1/1     Running   0          2h
wiremock-2   1/1     Running   0          2h
Headless Service creates DNS records for each Pod so that they are explicitly addressable by name with index:
http://wiremock-{index}.wiremocks:8080
As we know the number of replicas we can loop from 0 to N-1 and make API calls to set the mappings up.
As a result we will have two Services: one has ClusterIP assigned used by the app to balance the load between WireMock replicas and another one is Headless, used by the test to address each Pod directly.
Load generator setup
In the following example we will be using K6 as a load generator tool. We are sending 1000 requests per second to the /downstream/api/test endpoint that calls its HTTP dependency. For stubbed NFT the dependency is replaced by WireMock.
Before running the test we need to set stub mappings up for each WireMock replica. We have a helper function registerStubMapping() in wiremock.js that calls Administration API for each replica in a loop.
import { check } from 'k6';
import http from 'k6/http';

export function registerStubMapping(replicas, stubMappingDefinition) {
   for (let i = 0; i < replicas; i++) {
       const replicaEndpoint = `http://wiremock-${i}.wiremocks:8080`;
       callWiremock(replicaEndpoint, stubMappingDefinition);
   }
}

function callWiremock(endpoint, stubMappingDefinition) {
   const url = `${endpoint}/__admin/mappings`;
   const params = {
       headers: {
           'Content-Type': 'application/json',
       },
   };

   const res = http.post(url, JSON.stringify(stubMappingDefinition), params);
   check(res, {
       'stub mapping created': (r) => r.status === 201,
   });
}
K6 runs setup() function before executing the test. There we declare the dynamic mappings for our stubs.
import { check } from 'k6';
import http from 'k6/http';
import {registerStubMapping} from "./wiremock.js";

const wiremockReplicas = 3

const testData = "testing-data-string";

export const options = {
   scenarios: {
       loadTest: {
           executor: 'constant-arrival-rate',
           rate: 1000,
           timeUnit: '1s',
           duration: "3m",
           preAllocatedVUs: 200,
       },
   },
   thresholds: {
       checks: ['rate>0.99'],
       http_reqs: ['rate>999'],
       http_req_failed: ['rate<0.01'],
       http_req_duration: ['p(99)<500'],
   },
};

export function setup() {
   registerStubMapping(wiremockReplicas, {
       request: {
           method: 'GET',
           url: "/api/test"
       },
       response: {
           status: 200,
           jsonBody: {
               data: testData
           },
           headers: {
               'Content-Type': 'application/json'
           }
       }
   });
}

export default function () {
   const res = http.get("http://reference-service/downstream/api/test");
   check(res, {
       'status is 200': (r) => r.status === 200,
       'response body contains stubbed data': (r) => r.body.includes(testData),
   });
}
After the test we validate thresholds for TPS, latency and the number of errors.
Summary
High-quality software that functions as expected leads to happier customers. By using stubbing to ensure thorough testing, businesses can deliver reliable products that meet or exceed customer expectations, leading to increased customer satisfaction.
WireMock is an easy-to-use tool that allows creating http stubs and shows good performance under load. Unfortunately each tool has its own limits, so at some point we need to start thinking about scaling it. Horizontal scaling works well for stateless apps, but stateful apps may need some workaround.
In this blog post we have shown that WireMock can be scaled horizontally, so that we can use it for NFTs requiring high TPS and low latency.